|
Keylocking threaded inserts, Thinwall Industrial Style
Keylocking
threaded inserts, Heavy Duty Industrial Style
Material: Carbon Steel Inserts - C1215 or equivalent Stainless
Steel Insert - 303
Keys - 302
Finish: Carbon Steel Inserts - Parkerized Stainless Steel
Inserts - Passivated
Keylocking threaded inserts
Features:
-
Easy
Installation
Installed with standard drills and taps
No pre-winder required
No tang break-off.
-
Can be used in most materials
Aluminum, magnesium, cast iron, cold rolled steel and
plastic
-
Provide high strength and reliability.
One length per size provides maximum pullout strength.
Breaks Grade 8 bolts in test after test.
-
Easy to remove
-
No special skills required.
Installation procedures can be learned in minutes.
These key-locking threaded inserts are ideal for thread
reinforcement, especially when the mating stud or bolt will be
removed frequently. They provide strong, permanent steel threads
in a weaker parent material — ferrous, non-ferrous, or
non-metallic. Key Inserts are also well suited for quick repair
of stripped, damaged, or worn threads. A solid version is also
available to use as a handy plug to relocate holes drilled or
tapped on the wrong location. Install with standard drills and
taps. Important: Use tap drill specified in table (slightly
larger than standard for that thread size). Tap-drill hole
tolerance should be -.001/+.004 (-.001/+.005 above .500 dia).
Locking keys are driven down into the parent material during
installation, providing a positive mechanical lock against
rotation. Inserts with an ID thread 5/16 and above have four
locking keys, smaller sizes have two. Pull-out strength can be
calculated approximately by the following formula:

Key Inserts are often used to reinforce tapped holes
in aluminum tooling plates.
|
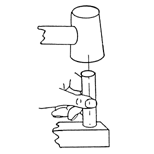
Easy Installation |
|
 |
|
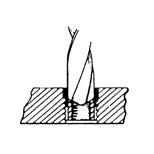
1. Drill out old threads using tap drill specified
in table (Important: Correct tap drill is slightly
larger than standard for that thread size). |
|
 |
|
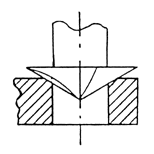
2. Countersink to diameter shown in table. |
|
 |
|
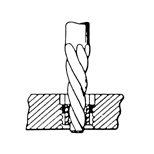
3. Tap new threads, using standard tap. |
|
 |
|
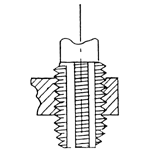
4. Screw in insert until body is slightly (.010 to
.030 inches) below the surface, by hand or using
installation tool. Keys act as a depth stop. |
|
 |
|
5. Drive keys down with several light hammer taps on
installation tool (or directly on keys if no
installation tool is available). |
|
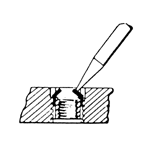
Easy Removal |
|
 |
|
1. Drill out locking keys with specified drill
diameter and depth (see table). |
|
 |
|
2. Deflect keys inward and break off. |
|
 |
|
3. Remove insert with an E-Z OUT type tool. |
|
 |
|
4. Screw replacement into original holes. Parent
material is totally undamaged. |
|
